How to Create a Custom Windows 10 Slideshow Background & Lock Screen
/shatton.jpg)
Subscribe to get updates!
Table of Contents
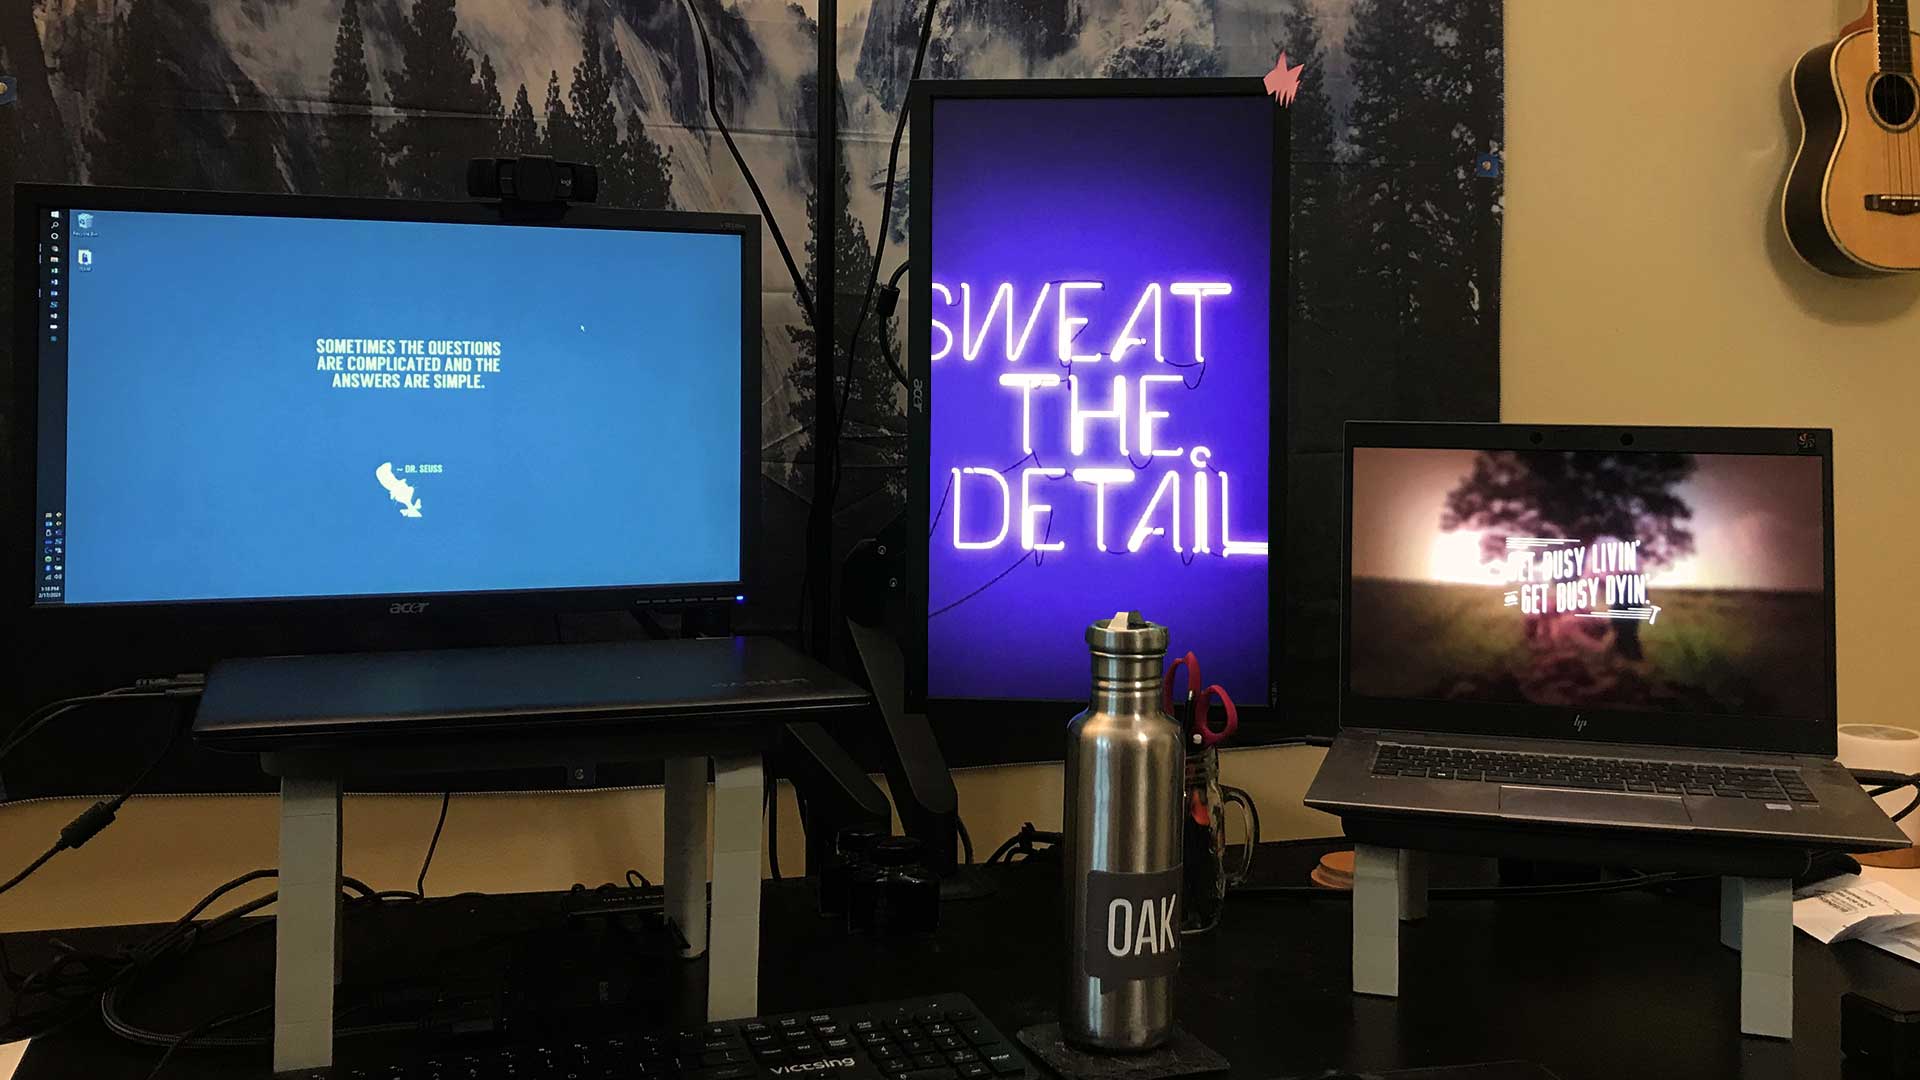
Did you know you can create a custom slideshow background in Windows 10? This customization makes it easy for you to make your computer feel more like your own. If you want to take it a step further, you can utilize this feature for setting up a slideshow with positive affirmations for boosting productivity and aid in dealing with stress at work.
So let's build a system for positivity through a personalized Windows 10 computer slideshow background with positive affirmations. And if you have multiple screens (I use three), then you will see a different motivational quote on each screen.
I’m going to show you how to set that up the following:
- Where to find high-quality gorgeous photos with encouraging words
- How to set up a Windows 10 slideshow background that rotates randomized images
- How to customize your windows lock screen image and set it for slideshow as well
First, collect your background images
Let’s get some good encouraging quotes images that are sure to boost confidence. My favorite sites for high-quality, beautiful graphics that anyone can use for free are Unsplash and Pexels. And most importantly, I trust everything I download from these sites.
- Unsplash search query for motivational quotes: https://unsplash.com/s/photos/motivational-quotes?orientation=landscape
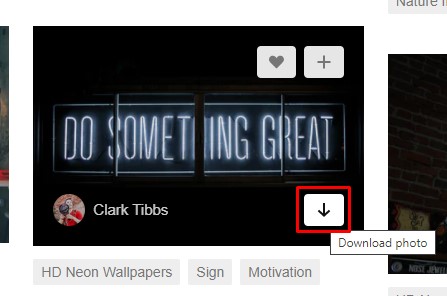
- Pexels search query for landscape motivational quotes: https://www.pexels.com/search/motivational%20quotes/?orientation=landscape
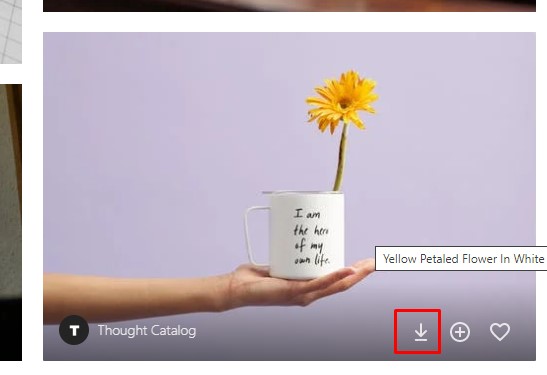
Note: If you have trouble downloading an image from here. Shoot us a note in the comments of this post or on Twitter @endsightit, and we’ll help out.
Part 1: Setting up a Windows 10 slideshow background
Step 1: Create a dedicated slide show background folder
After you’ve downloaded 10+ images, put them all into a folder that you will be able to easily find in the future in case you want to swap them out and/or add to them.
I prefer to use the Pictures folder.
- Right-click anywhere in your preferred folder and select New Folder.
- Alternatively, you can also press CTRL + SHIFT + N to create a new folder.
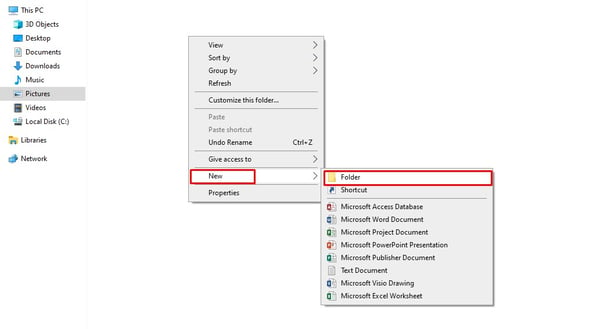
- Name it something like “desktop backgrounds”.
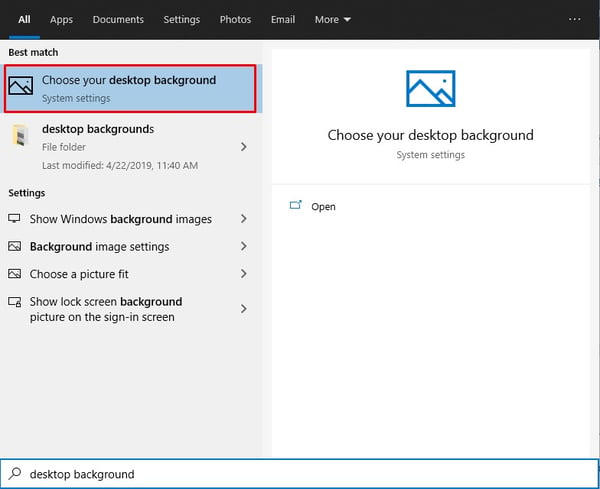
Step 2: Use Windows 10 search function to change desktop background
I could lead you through several clicks, but Windows has beefed up their search feature, and now it’s fast to find the right settings.
- Hit the Windows key and type “desktop background” in the search bar.
Step 3: Set the Background settings to slideshow
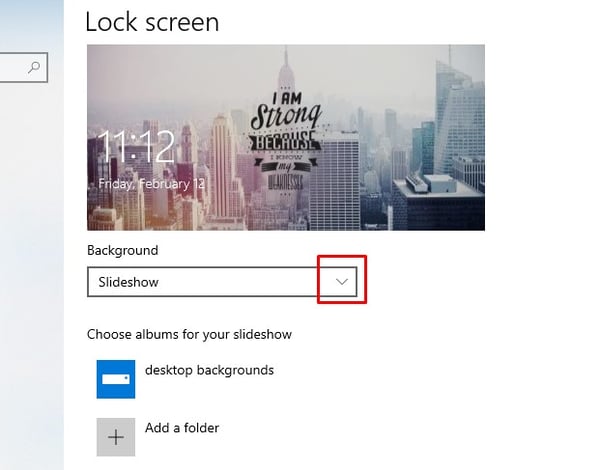
- Next, you will want to change the “Background” setting to “Slideshow”

This will bring up a section that says, “Choose albums for your slideshow”.
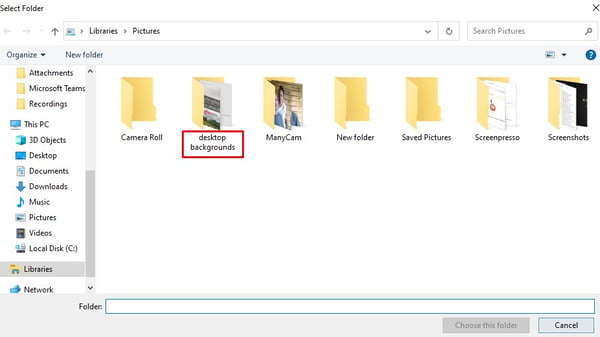
Step 4: Click the browse button and identify your folder
Step 5: Set the interval time for how often you want the wallpaper to change
I prefer 30 minutes. Since I like to marinate on messages over a period of time anyway. Besides, I usually always have one of my monitors under-utilized and don't want to be distracted with a rapidly changing background while I work.
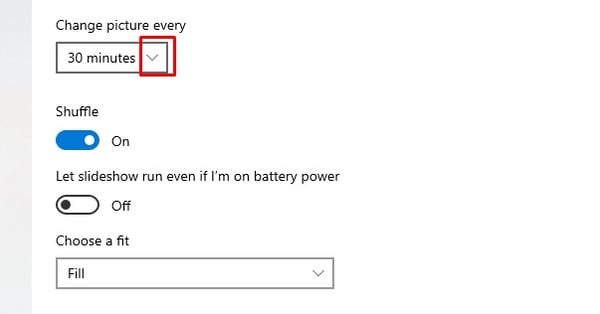
Step 6: Optimize it for variety, beauty, and battery life
The following are my suggested settings.
- Turn Shuffle “On” to create that element of randomized surprise.
- Leave the slideshow “Off” when you are on battery power since this feature does take some juice.
- Select “Fill” for the Choose a fit size. You can play around with others, but I think you’ll also come to the same conclusion that this setting makes everything look better.

You now, not only changed your desktop background, but you have done it in a way that should help you thrive more while you work.
Part 2: Setting up lock screen backgrounds for slideshow
This part is a little tricky because it is not fully intuitive. The first thing you need to do is set the primary photo. Then you need to set it up for a slideshow.
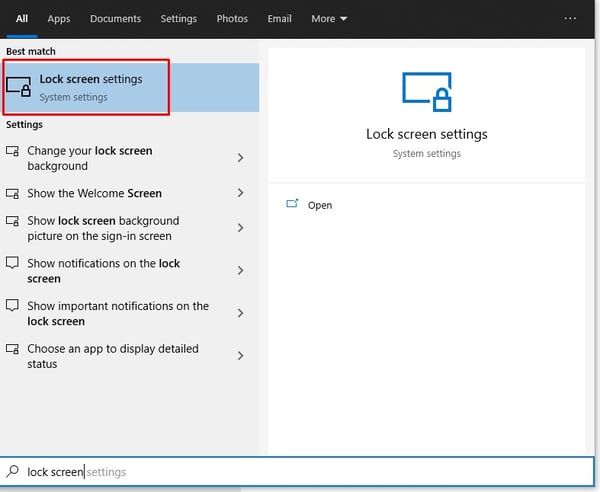
Step 1: Search for the settings for Lock Screen
- Hit the Windows key and type in “lock screen” to find the “Lock Screen Settings” and click it open.
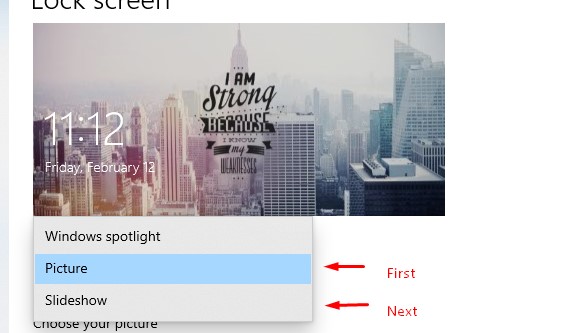
You will first need to set up a Picture. THEN you will need to set up a "Slideshow". I know that doesn’t seem to make sense. But it will in a bit.
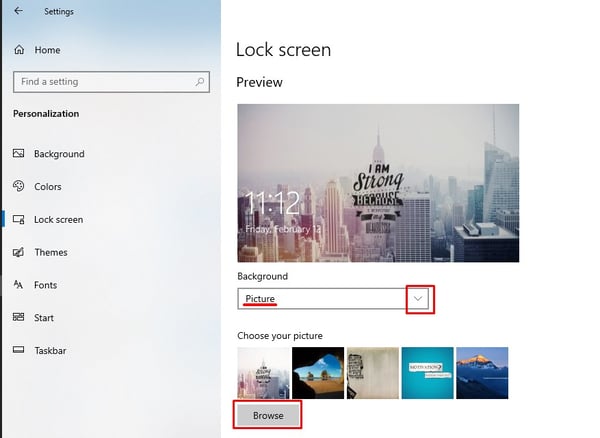
Step 2: Set the Windows lock screen image to your favorite confidence-boosting picture
- First set Background to “Picture”
- Next, browse for one of your favorite photos.
This is the picture that your slideshow will start with each time you lock your screen.
Alternatively, you could start your first slide with the “Windows Spotlight”, but I don’t like to use this feature because we get enough world news, current events, etc. And don’t really need another live advertisement from Microsoft. Sorry, Microsoft.
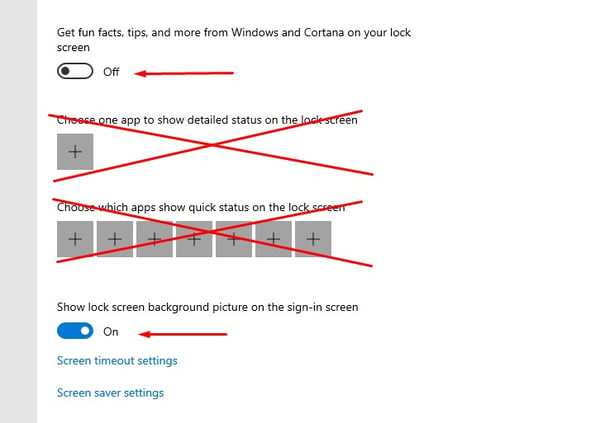
- I also prefer to turn Off the fun facts, tips, etc.
- And for privacy reasons, I keep all apps OFF of my lock screen for goodness sake!
- Finally, turn on the Show lock screen background picture on sign-in to see a blurred out view of your image rather than a boring solid color screen.
Step 3: Set the Windows lock screen up for a slideshow
- After your starting Picture is set up, go back to the top where you see the Background dropdown and select Slideshow.
Just like in Part 1 Step 4, where you identified your motivational quote desktop background folder, you’ll want to do the same.
- Hit the “Add a folder" button and browse to the folder you put all your backgrounds into.
Note: You won’t be able to change the interval like you were able to do in Part 1. It will be every few seconds rather than 30 minute intervals. But that’s okay. I feel like lock screens can be more distracting than desktop screens because you are not usually sitting down to work when your computer is locked.
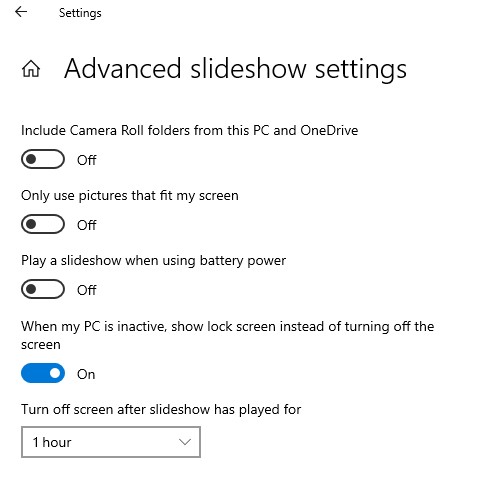
Step 4: Optional Advanced slideshow settings
The “Advanced slideshow settings” are all up to you, but I prefer to use the following settings (below).
I highly recommend never showing photos from your camera roll unless you are 100% confident in displaying every image you have stored in your Camera Roll and OneDrive. For me, it’s a security risk that I’m not willing to take.
Also, notice how I turn the thing off after 1 hour. I’m out of the room an hour later, so I don’t need it.
No need to save, everything should save in real-time. Thanks Microsoft!
Congratulations! You now have a better desktop background!
You have successfully personalized your Windows 10 slideshow background for both Desktop Background and Lock Screen.
Making your computer your own is very important. Anything that you can do with your computer to get you in a better headspace for work performance, we want to help. That’s why we have a technical support helpdesk that thousands of Northern California professionals have access to.
Also, feel free to check out some of our other free resources:

IT Outsourcing for Construction: Building Projects Without IT Issues
A Familiar Scene on the Job Site It’s early morning at a busy construction site. Crews are unloading materials,..
Your Connection to This Site is Not Secure: What It Means and How to Stay Safe
If you’ve ever visited a website and noticed the warning “Your connection to this site is not secure” in your browser,..
.svg)
Hackers Are Watching and Waiting… Don’t Risk Your Business and Future
Hackers Are Watching and Waiting… Don’t Risk Your Business and Future In today’s rapidly evolving digital landscape,..